An order block indicator is a trading tool built to highlight price areas where larger market participants may have previously placed meaningful buy or sell orders. In Forex trading, these zones are often used to plan potential reaction areas, continuation entries, reversal setups, and cleaner risk-to-reward trades.
After more than two decades of watching currency charts move through calm sessions, fast expansions, failed breakouts, and brutal reversals, I can say this clearly: an order block is not magic. It is a map. The trader still has to read the terrain.
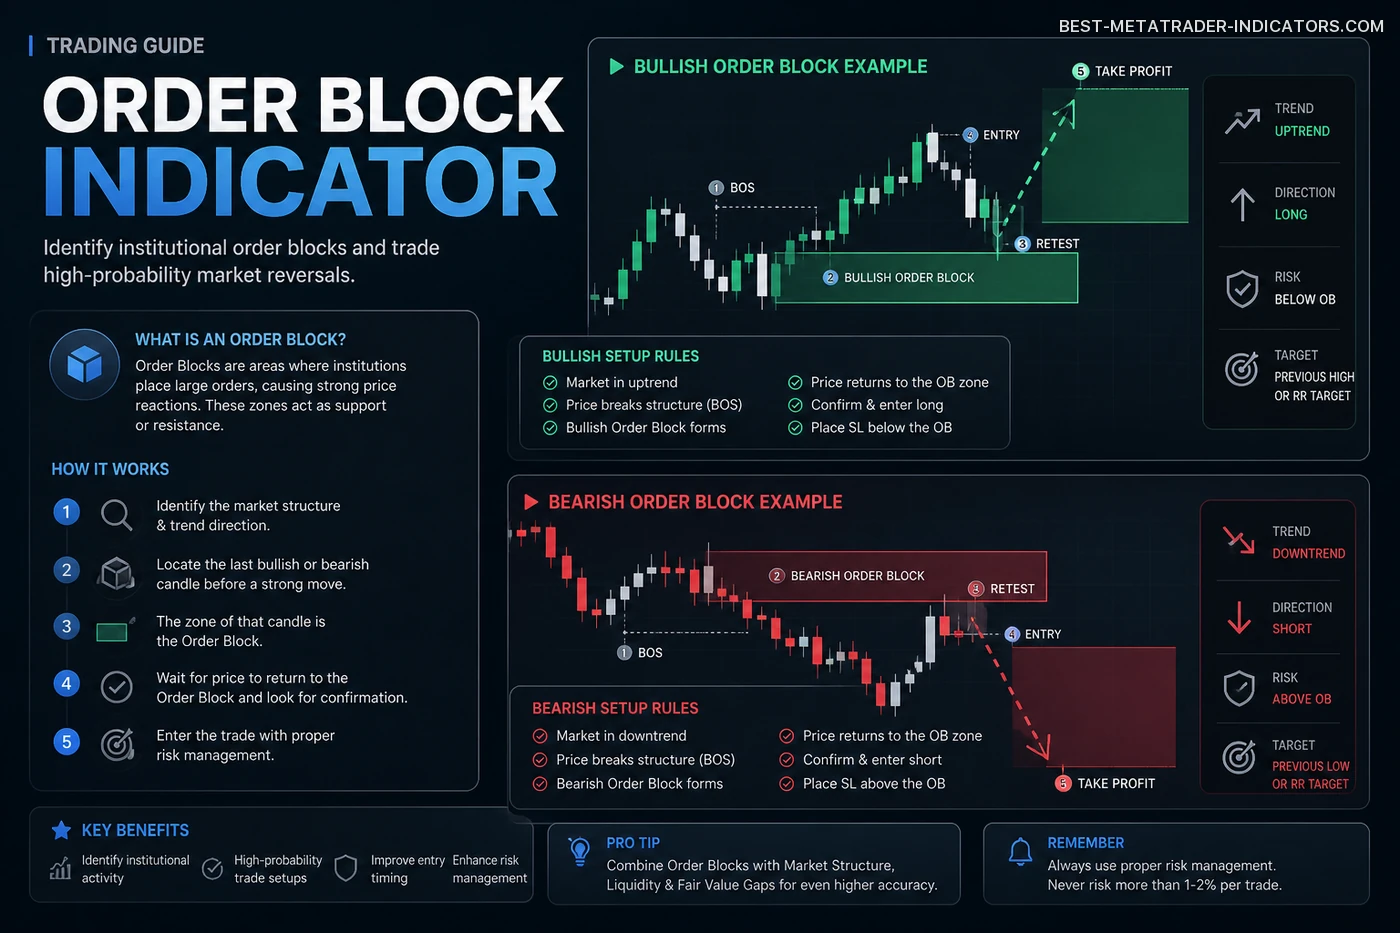
📌 What Is an Order Block Indicator?
An order block indicator attempts to detect and mark areas on a chart where price previously showed signs of heavy participation. These areas are usually linked to strong impulsive moves, breaks of structure, liquidity sweeps, or sharp rejections from key zones.
In practical terms, the indicator tries to answer one question: where did strong buying or selling likely appear before price moved aggressively?
Buy Order Block
A bullish zone where price may return before continuing higher. Traders often look for these after a strong upward move, a clean break of resistance, or a shift from selling pressure into demand.
Sell Order Block
A bearish zone where price may return before continuing lower. These areas are often found before strong downside displacement, especially when price leaves the zone with speed and conviction.
Mitigation Zone
A retest area where price comes back to revisit a previously active price zone before moving again. Some traders use this return as a possible entry area, but only after checking structure and reaction.
🧠 Why Forex Traders Use Order Blocks
Forex markets are deeply liquid, but they are not as random as they look on a noisy chart. Price often moves from one liquidity area to another. Order blocks help traders frame potential zones where larger participation may defend positions, rebalance orders, or trigger the next directional move.
- To identify possible institutional-style support and resistance zones.
- To avoid chasing price after large impulsive candles.
- To wait for retracements into more favorable entry areas.
- To combine market structure with liquidity-based setups.
- To improve risk-to-reward by entering closer to invalidation levels.
Trader’s note: The best order blocks usually appear after price takes liquidity, creates displacement, and breaks structure. A random candle before a move is not automatically a high-quality order block.
🚀 Pro-Level Indicators Built to Elevate Your Trading Game


🔍 How an Order Block Indicator Usually Works
Different indicators use different formulas, but most order block indicators scan for specific price behavior. They often look for strong candles, break-of-structure events, previous consolidation areas, swing highs, swing lows, and zones that price has not yet fully retested.
| Indicator Feature | What It Means | Trader’s Use |
|---|---|---|
| Bullish Order Block | Potential demand zone after bullish displacement. | Look for long setups after confirmation. |
| Bearish Order Block | Potential supply zone after bearish displacement. | Look for short setups after confirmation. |
| Break of Structure | Price breaks a previous swing high or low. | Confirms a possible directional shift. |
| Mitigated Block | Price has already returned to the zone. | May reduce future reliability. |
| Unmitigated Block | Price has not yet revisited the zone. | Often watched for first-touch reactions. |
⚙️ Manual Order Blocks vs. Order Block Indicators
Many traders ask whether they should use an automatic order block indicator or mark the zones manually. The honest answer is simple: both can help, but each one has clear weaknesses.
Comparison: manual analysis versus automated order block detection.
| Method | Strengths | Weaknesses | Best For | Rating |
|---|---|---|---|---|
| Manual Order BlocksTrader-drawn zones | More flexible, context-aware, and structure-based. | Requires experience and can be subjective. | Advanced traders and discretionary setups. | ★★★★★ |
| Order Block IndicatorAutomated detection | Fast, visual, beginner-friendly, and consistent. | Can mark too many zones or miss market context. | Screening, learning, and confirmation support. | ★★★★☆ |
| Hybrid ApproachIndicator plus trader judgment | Combines speed with experience. | Still needs discipline and filtering. | Most serious Forex traders. | ★★★★★ |
📈 Core Strategy: Order Block With Market Structure
The cleanest way to trade order blocks is to combine them with market structure. You want price to reveal intent before you risk capital, rather than guessing at every highlighted rectangle.
- Identify the higher-timeframe bias. Start with the daily, 4-hour, or 1-hour chart.
- Wait for liquidity to be taken. Look for a sweep of a previous high or low.
- Confirm displacement. Price should move strongly away from the swept area.
- Mark the order block. Use the last opposite candle or consolidation area before the impulse.
- Wait for the retest. Do not chase the move.
- Enter only with confirmation. Use lower-timeframe structure, rejection, or momentum confirmation.
- Place stop loss beyond invalidation. The block should define your risk.
- Target liquidity. Aim for previous highs, lows, equal highs, equal lows, or imbalance fills.
Professional tip: A valid order block should give you a logical reason for entry, stop placement, and target selection. If you cannot define all three before entering, the setup is not ready.
🧩 Strategy Ideas for Forex Order Block Trading
1. London Session Retracement
Mark the Asian session high and low. If London sweeps liquidity and creates displacement, wait for price to retrace into the order block. This approach often works well on EUR/USD, GBP/USD, and EUR/JPY when volatility expands cleanly after a quiet range.
2. Higher-Timeframe Continuation
Find a daily or 4-hour trend. Wait for price to pull back into a higher-timeframe order block, then refine the entry on the 15-minute or 5-minute chart. The goal is to trade with the larger structure, not against it.
3. Liquidity Sweep Reversal
When price sweeps a major high or low and quickly rejects, look for the order block that caused the rejection. This can create strong reversal opportunities when the failed breakout is followed by a clear structure shift.
4. Volatility Expansion Setup
During fast session transitions, order blocks can still work, but spreads, speed, and slippage can punish weak execution. Wait for post-spike structure instead of trading the first emotional move.
🛠️ Best Settings for an Order Block Indicator
There is no universal “best” setting because each trader uses different pairs, timeframes, and risk models. Still, a few practical guidelines can reduce chart noise and make the indicator more useful inside MetaTrader or any similar technical platform.
| Setting | Conservative Approach | Aggressive Approach |
|---|---|---|
| Timeframe | 1H, 4H, Daily | 5M, 15M, 30M |
| Zone Sensitivity | Low sensitivity to show fewer zones | High sensitivity to show more zones |
| Mitigated Blocks | Hide after first touch | Keep visible for reference |
| Break of Structure Filter | Required | Optional |
| Alerts | Zone approach only | Zone creation and retest |
My preference: I want fewer but cleaner zones. Too many order blocks create analysis paralysis. In trading, clarity often beats complexity.
✅ Order Block Trading Checklist
Before taking a trade from an order block, run through this checklist. It can save you from many low-quality entries, especially when the chart looks tempting but the setup is not fully formed.
- Has price taken obvious liquidity before reaching the setup?
- Is there a clear break of structure or change of character?
- Did price leave the order block with strong displacement?
- Is the order block aligned with the higher-timeframe bias?
- Is the zone fresh or already heavily mitigated?
- Is there enough room to the next liquidity target?
- Does the trade offer at least a reasonable risk-to-reward ratio?
- Are spreads and execution conditions acceptable for the setup?
- Can the stop loss be placed beyond a logical invalidation point?
- Are you following your plan, or are you forcing a trade?
⚠️ Common Mistakes With Order Block Indicators
Warning: Many traders fail not because order blocks are useless, but because they treat every highlighted zone as a guaranteed reversal area. An indicator can mark a zone. It cannot understand your risk tolerance, market rhythm, or emotional state.
Chasing Every Zone
Not every order block deserves a trade. Some zones are weak, old, already mitigated, or located directly against current momentum.
Ignoring Higher Timeframes
A 5-minute bullish order block means little if the 4-hour chart is aggressively bearish and price is trading into major supply.
No Confirmation
Blind limit orders can work for some traders, but most traders benefit from confirmation such as rejection, lower-timeframe structure, or a momentum shift.
Poor Stop Placement
Putting the stop too tight inside the block often results in unnecessary losses. Place risk beyond logical invalidation, not where it feels comfortable.
💡 Practical Tips From Experience
Order block trading becomes more powerful when you stop looking for perfect entries and start thinking in probabilities. A clean zone does not promise a winning trade, but it can give you a cleaner decision point.
- Trade fewer pairs. Master two or three major pairs before scanning everything.
- Use session timing. London and New York often create cleaner liquidity runs.
- Respect abnormal volatility. Sudden speed, widened spreads, and disorderly candles can invalidate technical zones quickly.
- Journal screenshots. Save before-and-after examples of every order block trade.
- Track first-touch reactions. Many clean order blocks react best on the first return.
- Combine with liquidity. The best zones usually sit near stops, highs, lows, and imbalances.
- Avoid clutter. Remove weak zones from your chart to keep decision-making clean.
📊 Example Trade Plan Using an Order Block Indicator
| Step | Question | Decision |
|---|---|---|
| 1 | What is the higher-timeframe trend? | Only trade in the direction of the dominant structure. |
| 2 | Where is liquidity? | Mark equal highs, equal lows, swing points, and session highs/lows. |
| 3 | Has price displaced? | Wait for strong movement away from the order block. |
| 4 | Where is invalidation? | Place stop beyond the block or structural swing. |
| 5 | Where is the target? | Aim for the next liquidity pool or imbalance. |
🧭 When Not to Use an Order Block Indicator
Sometimes the best trade is no trade. Order block indicators are less useful when price is extremely choppy, spreads are unusually wide, liquidity is thin, or candles are overlapping without clear displacement.
Avoid trading order blocks blindly during: messy ranges, thin-liquidity rollover periods, holiday-style sessions, disorderly spikes, and moments when price action is too fast to define clean invalidation.
🧪 Backtesting Ideas
Before using any order block indicator on a live account, test it properly. A trader who does not backtest is usually just collecting opinions from the market at full price.
- Test at least 100 historical setups per currency pair.
- Separate London, New York, and Asian session results.
- Record win rate, average reward-to-risk, and maximum drawdown.
- Compare first-touch entries versus confirmation entries.
- Track performance during trending and ranging markets separately.
- Review whether higher-timeframe alignment improves results.
❓ FAQ: Order Block Indicator
Is an order block indicator accurate?
It can be useful, but accuracy depends on market context, settings, timeframe, and how the trader filters signals. No indicator is accurate all the time.
Can beginners use order blocks?
Yes, but beginners should first learn market structure, liquidity, support and resistance, and risk management. The indicator should support learning, not replace it.
What timeframe is best for order blocks?
Higher timeframes such as 1H, 4H, and Daily usually produce cleaner zones. Lower timeframes can help refine entries but create more noise.
Should I use limit orders or confirmation?
Experienced traders may use limit orders in very clean zones. Most traders are better served by waiting for confirmation before entering.
Do order blocks work on all Forex pairs?
They can appear on all pairs, but major pairs usually offer cleaner liquidity, tighter spreads, and more reliable execution than exotic pairs.
Is order block trading the same as supply and demand?
They are related, but not identical. Order blocks focus more on institutional-style footprints, displacement, structure breaks, and liquidity behavior.
🏁 Final Thoughts
An order block indicator can be a valuable tool for Forex traders who want to identify institutional-style price zones more efficiently. But the indicator is only one piece of the puzzle. The real edge comes from combining order blocks with market structure, liquidity, session timing, confirmation, and strict risk management.
Use the indicator as a guide, not a signal machine. Let it show you where to pay attention, then let price action prove whether the level deserves your capital.
Trading reminder: Protect your account first. Opportunities are endless, but trading capital is not.
Risk disclaimer: Forex trading involves significant risk and may not be suitable for all traders. This article is for educational purposes only and does not constitute financial advice, investment advice, or a recommendation to buy or sell any financial instrument.